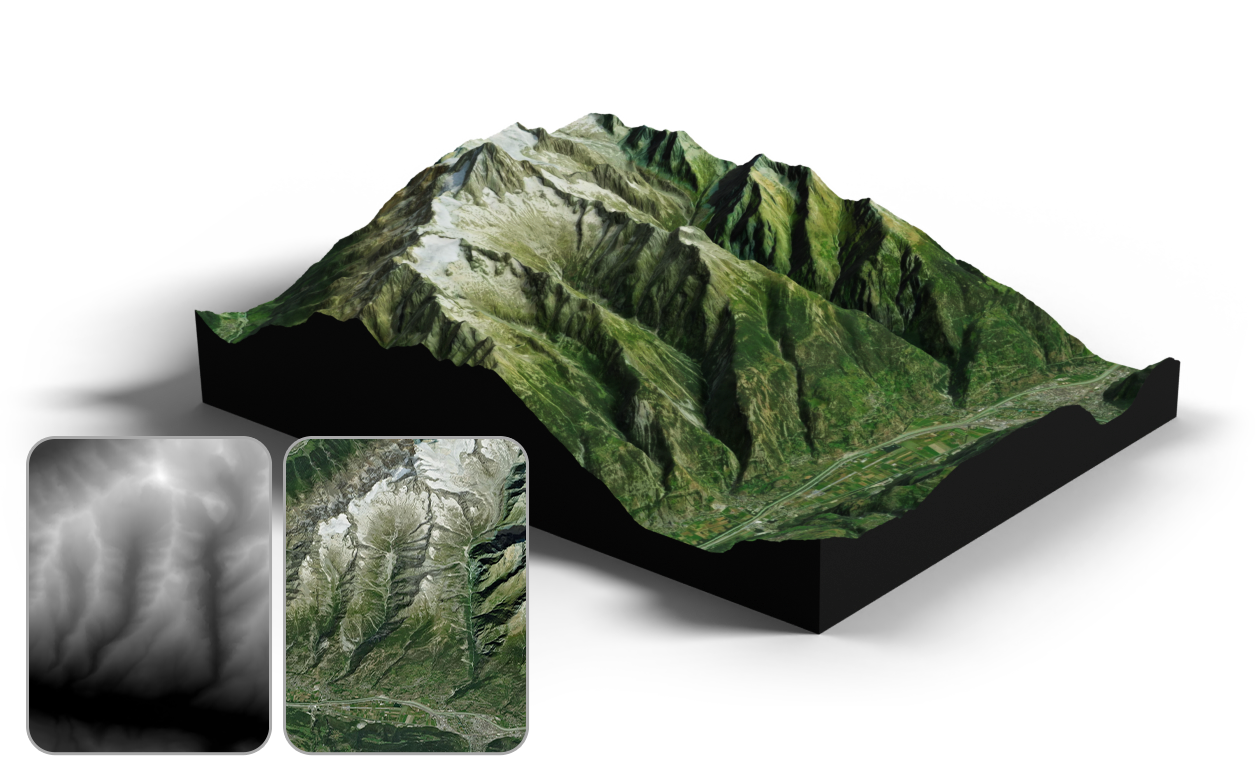
How to create a 3D landscape from heightmap and texture in Blender
Download Heightmaps & Textures
In this guide, you’ll learn how to create a 3D landscape in Blender using a heightmap and texture set from 3D-Mapper.
Resources:
Get heightmap + texture from tutorial
Get Blender
Get GIMP
Blender Tutorial
How to Create a 3D Landscape from Heightmap and Texture in Blender
Creating realistic 3D landscapes in Blender doesn’t have to be difficult. With a heightmap and a matching texture set, you can turn real-world terrain data into a detailed 3D landscape suitable for animations, visualizations, games, or map design.
In this step-by-step guide, you’ll learn how to create a 3D landscape in Blender using a heightmap and texture downloaded from 3D-Mapper.
What You Need
Before you begin, download these free or included tools:
-
Heightmap & Texture Set (from 3D-Mapper)
-
Blender 4.0+
-
GIMP or another image editor (optional)
These assets allow you to build a highly detailed 3D landscape in minutes, even without advanced 3D knowledge.
What Is a Heightmap?
A heightmap is a grayscale image where the brightness values represent elevation.
- White = highest points
- Black = lowest points
Blender can interpret these grayscale values as displacement, allowing you to create a realistic 3D terrain mesh from a simple image. Combined with a matching texture set (satellite or topographic), this produces a visually accurate landscape.
Step 1: Download the Heightmap and Texture Set
Start by creating a 3D map of your desired real-world area using the 3D-Mapper Location Browser. Export the map as a heightmap + texture set, choosing 8-bit or 16-bit for best quality.
16-bit heightmaps are recommended for smoother elevation details and better shading.
Step 2: Import the Heightmap in Blender
- Open Blender and enable the Images as Planes add-on if it’s not active.
- Go to File → Import → Images as Planes.
- Select your downloaded heightmap file.
- Blender will place the heightmap on a plane object, ready for displacement.
This creates your terrain base mesh.
Step 3: Add Displacement to Create the 3D Landscape
- Select the plane.
- Open Modifier Properties.
- Add a Displace Modifier.
- In the Texture slot, choose the imported heightmap.
- Adjust the Strength slider until the terrain looks accurate and natural.
Tip:
Switch to Adaptive Subdivision (Cycles) for smoother displacement and higher detail.
Step 4: Convert to Mesh and Refine Geometry
- To gain full control over the terrain, convert the displaced plane into a mesh:
- Go to Object → Convert To → Mesh
- Apply Subdivision Surface Modifier for smoother topology
- Adjust Shading → Smooth
This gives you a clean, editable terrain model.
Step 5: Apply the Texture to the Landscape
- To create a realistic land surface:
- Switch to the Shader Editor.
- Add an Image Texture node.
- Load the matching texture PNG from your download.
- Connect it to the Base Color of your material.
- Set mapping to UV for accurate alignment.
Now your 3D terrain has both elevation and surface detail.
Step 6: Final Adjustments (Lighting, Camera, Rendering)
Enhance your final landscape using Blender’s built-in tools:
Lighting
-
Use HDRI environments
-
Add soft sunlight for depth
-
Avoid flat lighting for terrain renders
Camera
-
Slightly tilt the camera (5–15°) for a natural topographic angle
-
Use depth of field for dramatic effects
Rendering
-
Switch to Cycles for the most realistic results
-
Increase samples for clean, sharp terrain details
Why Use 3D-Mapper Heightmaps for Blender?
- With 3D-Mapper, you get:
- High-resolution real-world terrain
- Clean grayscale heightmaps
- Matching texture sets
- Export options for 3D printing, glTF, image exports, and more
This ensures perfect compatibility with Blender and dramatically reduces manual cleanup or alignment work.

Use Cases: What You Can Create
- Your Blender 3D landscape can be used for:
- Game environments
- Architectural visualizations
- Outdoor route previews
- Terrain-based animations
- Historical reconstruction
- Custom artistic landscape renders
Whether you’re a hobbyist or a professional artist, the workflow is efficient and produces high-quality results every time.
Summary
Creating a 3D landscape in Blender from a heightmap is a fast and powerful way to turn real terrain into a fully functional 3D model. With a displacement workflow, matching textures, and Blender’s rendering tools, you can transform any region into a stunning visual landscape.
If you want to explore more mapping tools, interactive maps, and downloadable map files, try the 3D-Mapper Studio.
